

Google Ads
How to create a Google Ads account or MCC
Open the link: https://ads.google.com
Sign in to the appropriate MCC (“Kaizen Agency”) from the MCC agency admin email address, which is am@kaizen-agency. All access credentials are available in Vault.
This second step depends on your contact's profile:
- If it is a prospect, go into the MCC - Kaizen Agency - Audits
- If it is a client:
- First: Go into the MCC - Kaizen Agency - Clients
- Second: Go into your MCC (for example: Kaizen Agency - Manon)
This third step is common to both contact profiles described above.
Once you are in the MCC where you want to add a new account or MCC, all that remains is to create it, as follows:
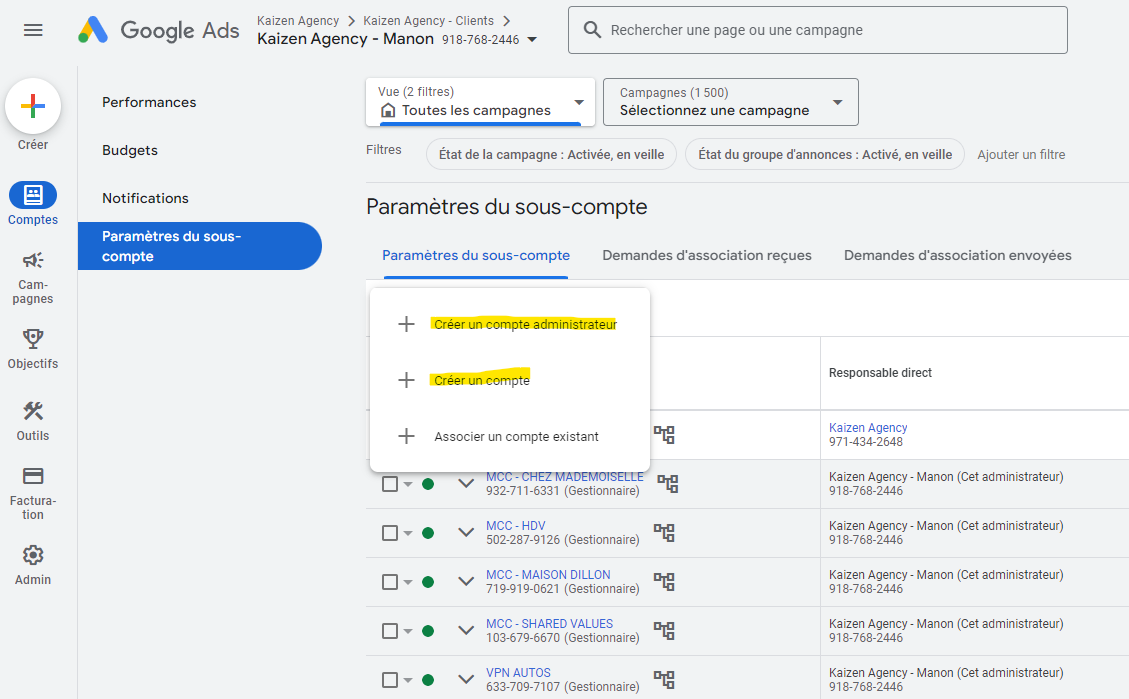
After you click “Create an account” or “Create a manager account”, you will be redirected to the first configuration step to set the basic parameters:
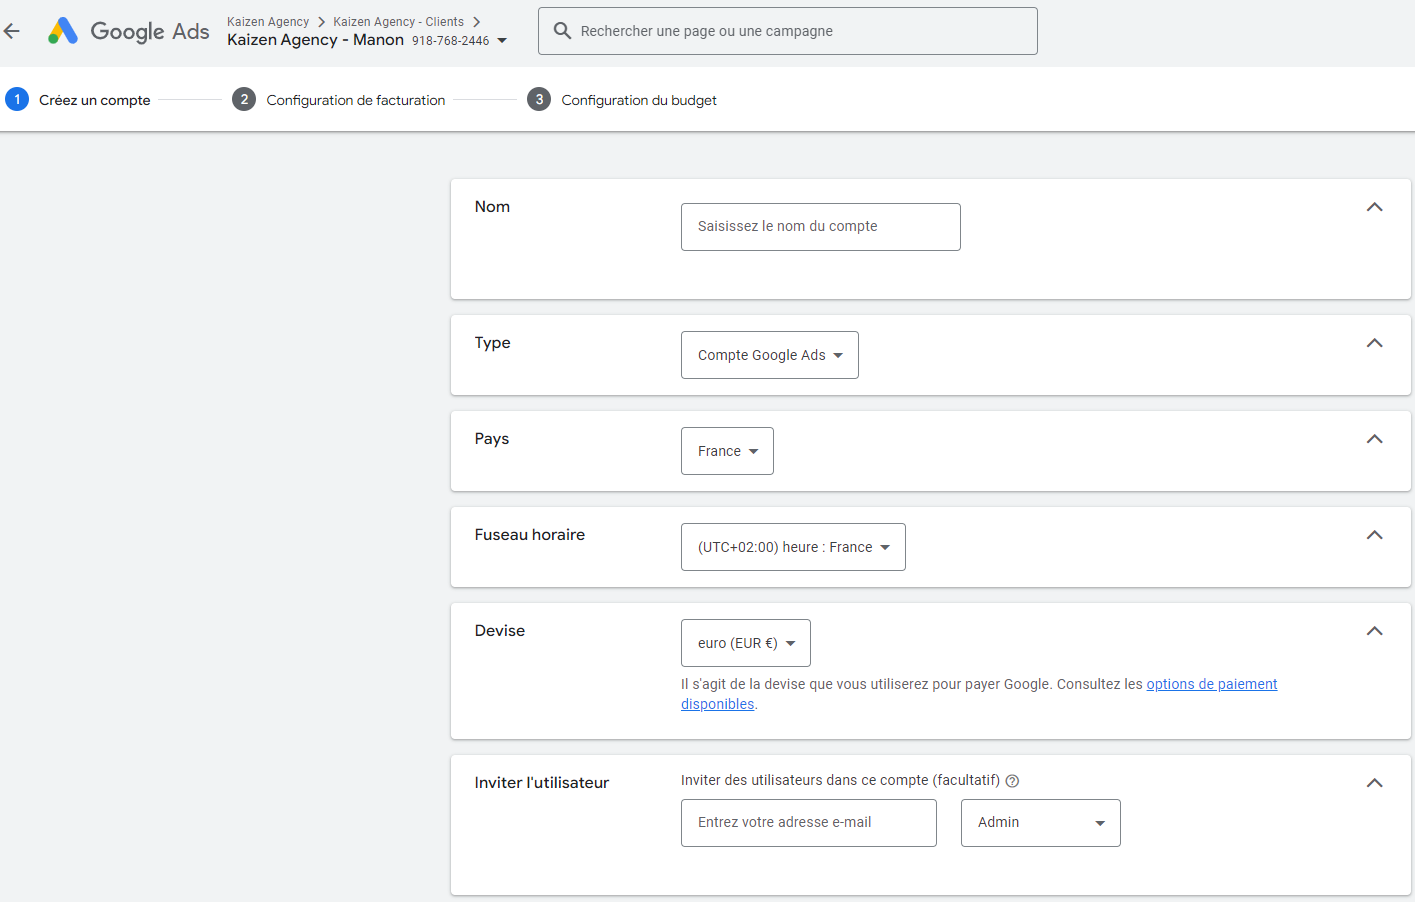
Make sure to enter the correct information, especially currency and time zone, as these are quite difficult to change later. It requires Google support intervention, which takes time and certain permissions.
The second step is billing configuration. Google offers two options:
-
Select an existing billing setup. Note that this option is fairly rare. It means the client already has a payments profile ID on Google Ads. If the client has never used Google Ads, they will not have one. We use this option in the case of Bardinet, which covers the Negrita, Maison Dillon, and Old Nick brands.
-
Create a setup with another payment method. This is the option we use most often. It lets you create a profile from scratch. To do so, you will need information about the company (head office postal address), about the primary payments profile user (often the Web Marketing Manager or the accounting department, as well as the payment method), and about the chosen payment method.
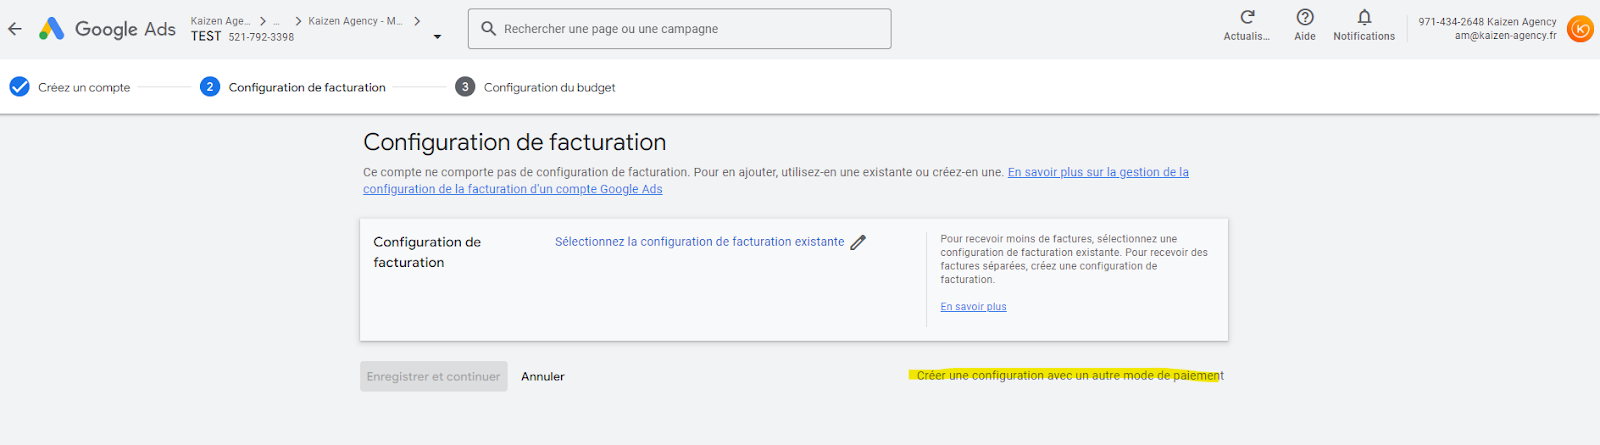
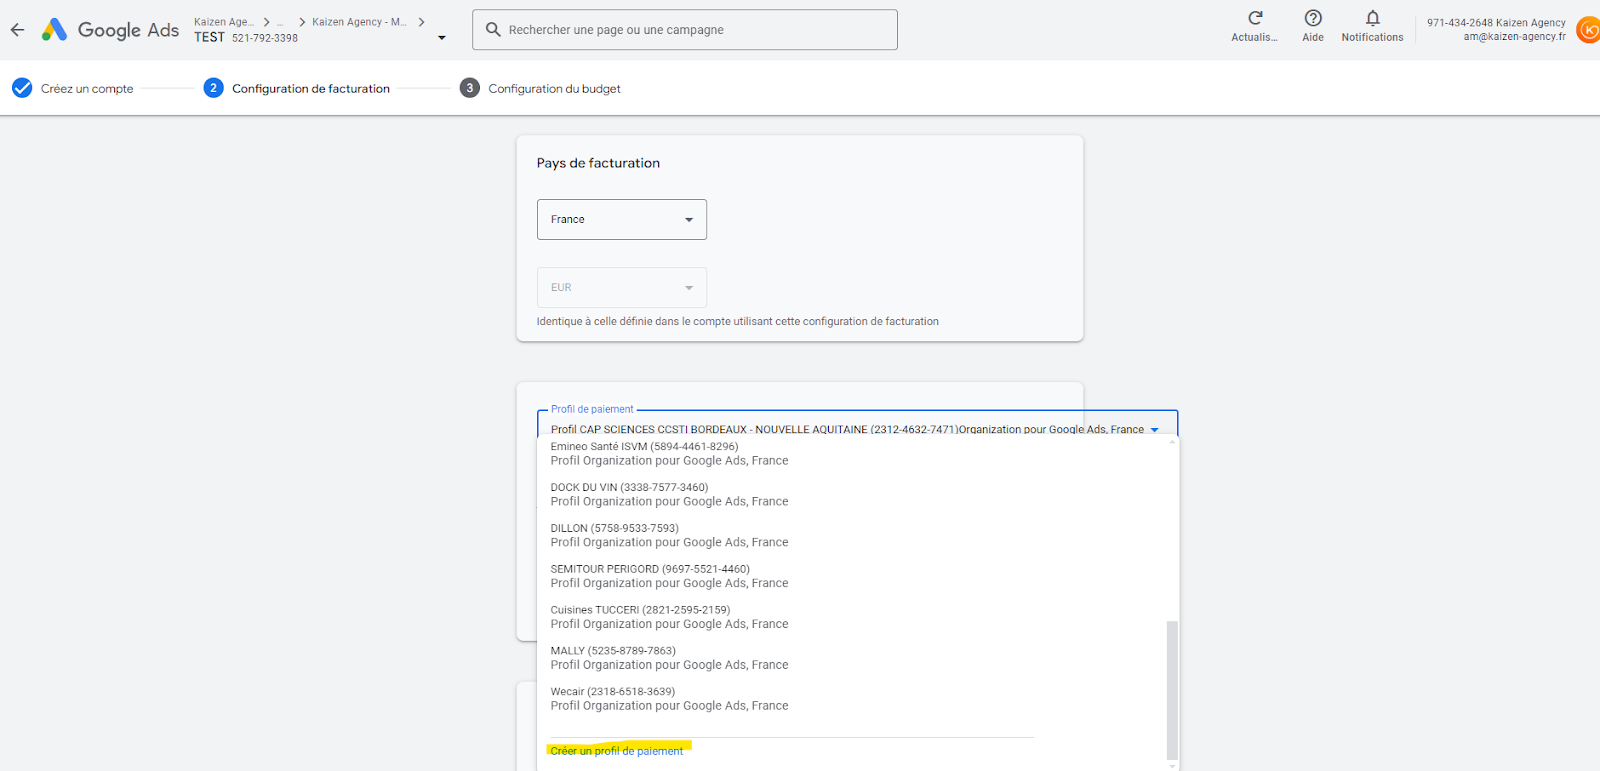
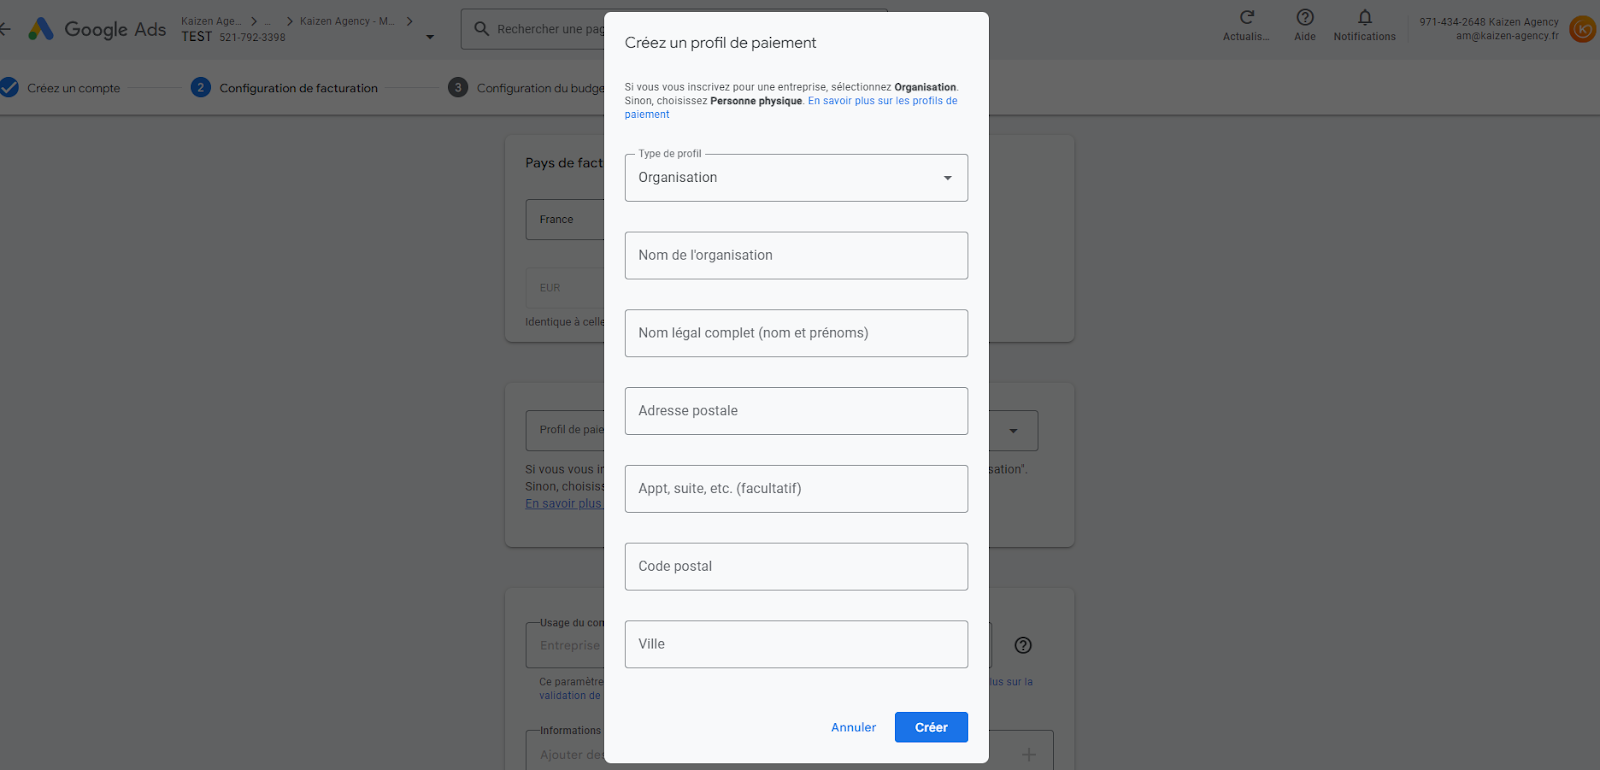
Make sure to enter the correct information in the Google Ads account payments profile, as this is difficult to change later. It requires Google support intervention, which takes time and certain permissions.
You can leave the payments profile creation phase at any time. The Google Ads account or MCC will still be created and accessible from your MCC - Consultant.
If you are missing information from your client, you can complete it later.
What payment methods does Google Ads offer?
Google Ads offers advertisers three payment methods:
-
Credit/debit card: Your client simply enters their card details directly on the Google Ads platform.
- Advantage: Easy and quick to set up
- Disadvantages:
- Clients often make other purchases on the same card and hit the limit. Once that limit is reached, the card can no longer be charged. By extension, the Google Ads account can no longer serve ads until a payment goes through. To resolve this, the client must contact their bank.
- There are payment thresholds. When campaigns launch, these thresholds are especially close together, and as Google gains confidence that the client is solvent, it widens them. The client will have dozens of monthly charges.
-
IBAN: Your client can share their bank account details (RIB) so you can enter them on the platform. Once the bank details are entered, Google starts a bank account verification phase. Within 3 to 5 business days, it makes a deposit of less than €1. The client must log into their bank account and tell us the amount of that deposit so we can enter it on Google Ads and verify the payment method.
- Advantage: Avoids payment suspensions.
- Disadvantages:
- Setting up this payment method takes longer than a credit/debit card.
- There are payment thresholds. When campaigns launch, these thresholds are especially close together, and as Google gains confidence that the client is solvent, it widens them. The client will have dozens of monthly charges.
-
Monthly invoicing: This billing method is the most convenient for advertisers. Instead of payment thresholds and constant charges, your client receives a single invoice covering all spend from the previous month, to be paid to Google. This is not a manual payment, unlike the two payment methods above.
- Advantage: Easier payment management.
- Disadvantages: This payment method is not available to all advertisers. To qualify, you must submit a request to Google Ads support and meet the following conditions:
- Be registered as a business for at least one year
- Have an active Google Ads account in good standing for at least six months
- Have spent a minimum of €5,000 per month for at least three of the last 12 months (amount varies by country).
As an agency, if we are the paying agent, we can benefit from monthly invoicing even if we do not meet the eligibility conditions.
How to share your account ID
Open the link: https://ads.google.com
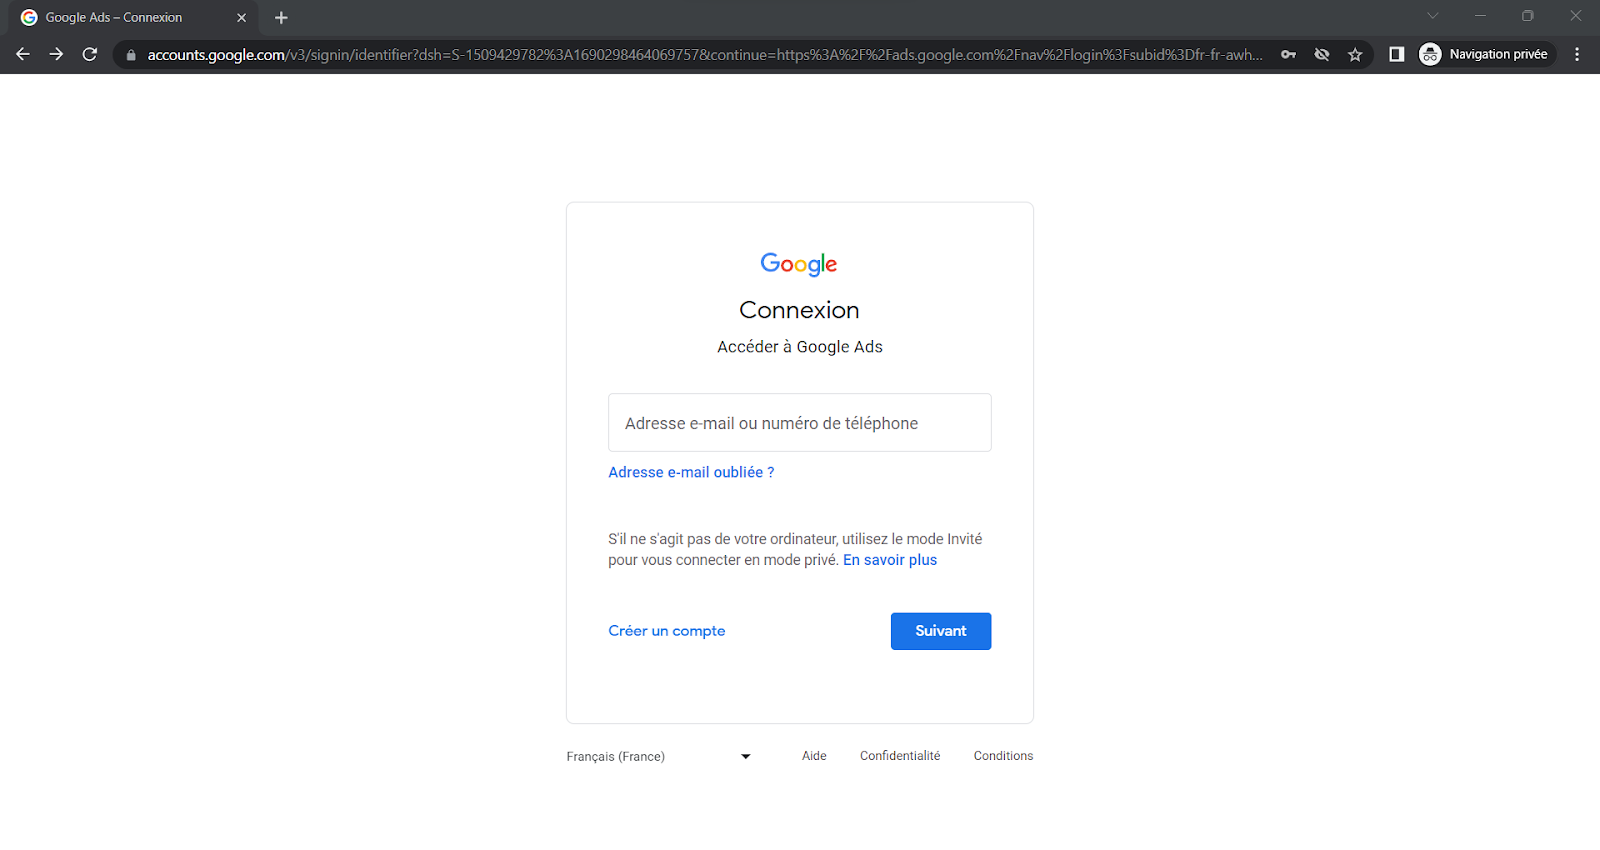
If you are not signed in to your Google account, enter your email address and password.
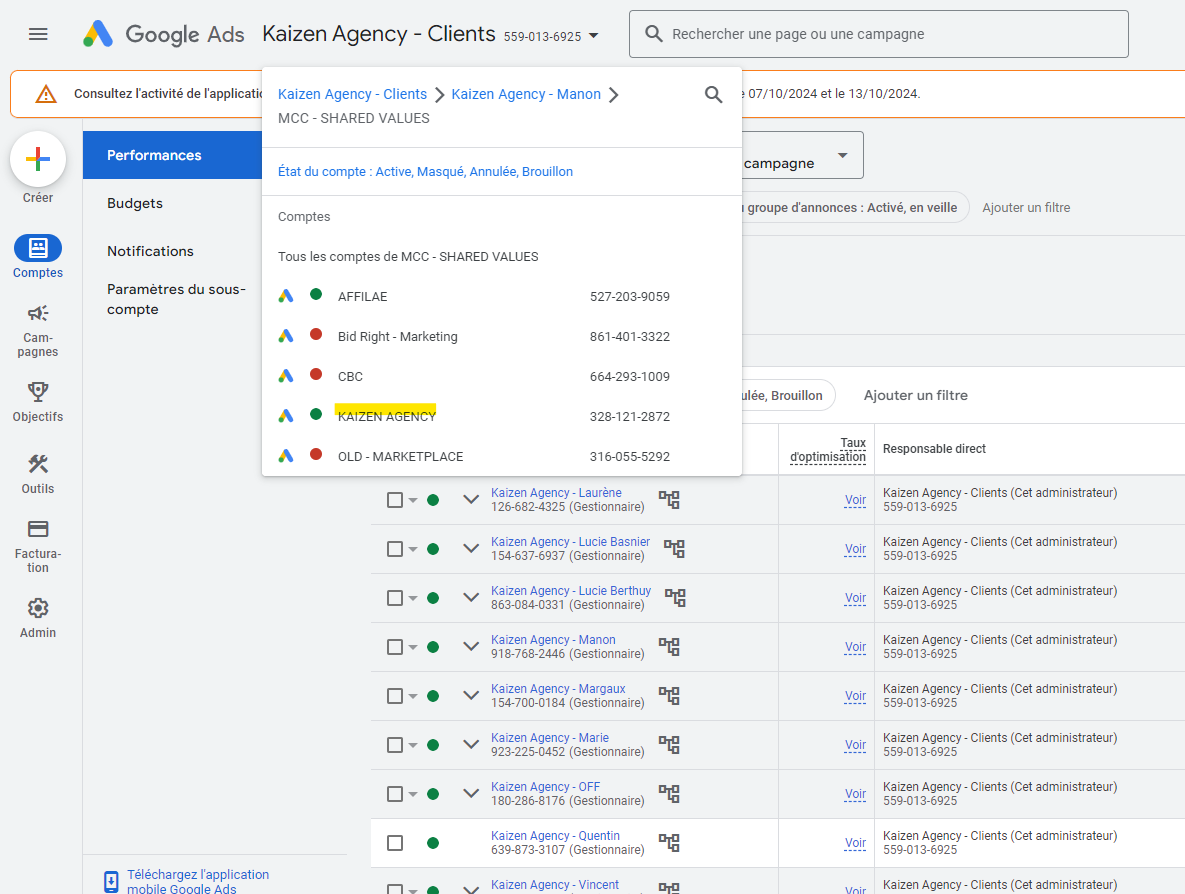
When you access your Google Ads account, select the account for which you need the ID.
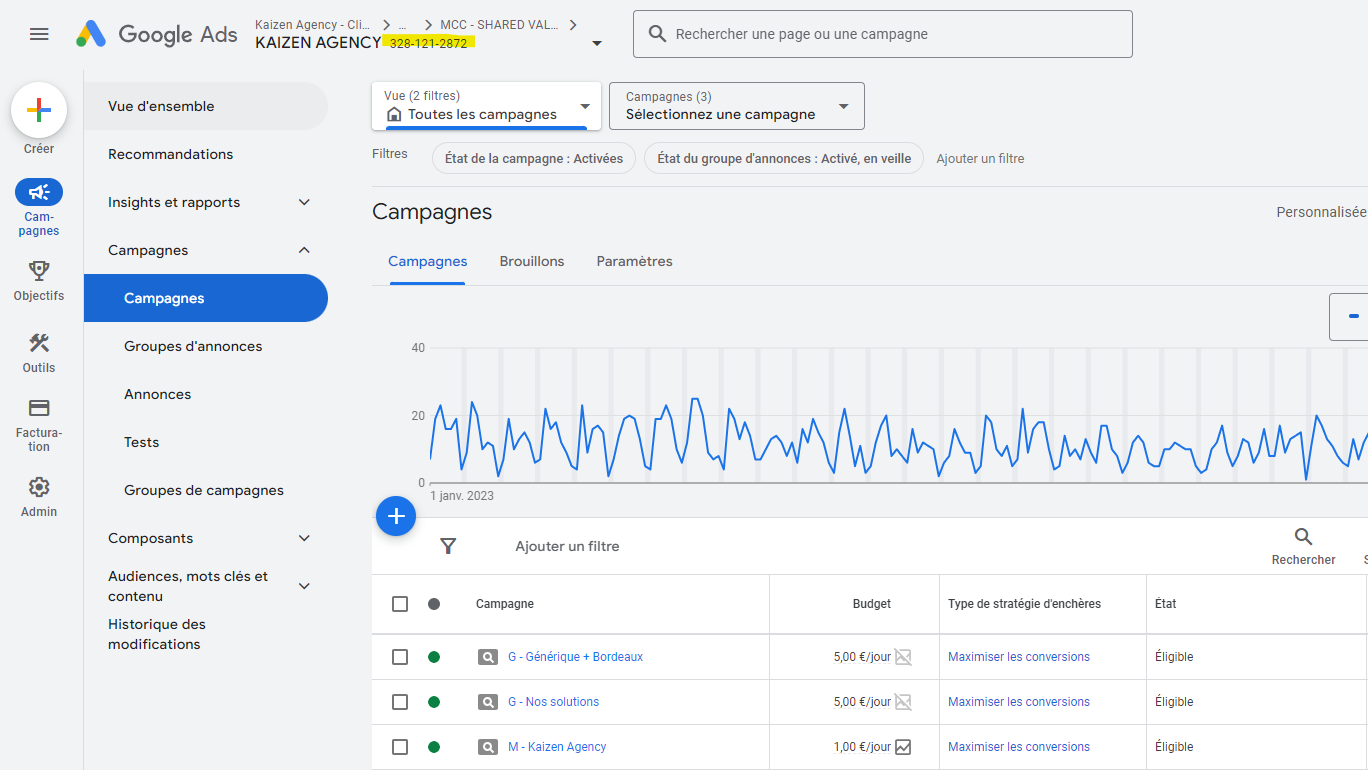
Once you have accessed your Google Ads account, you will find your ID in the top left. It is the 10-digit number following the name you gave your account, in this format: XXX-XXX-XXXX.
How to invite a user to an MCC or Google Ads account
Sign in to the client account for which you want to grant access.
Once you have access to the account, go to the “Admin” > “Access and security” tab:
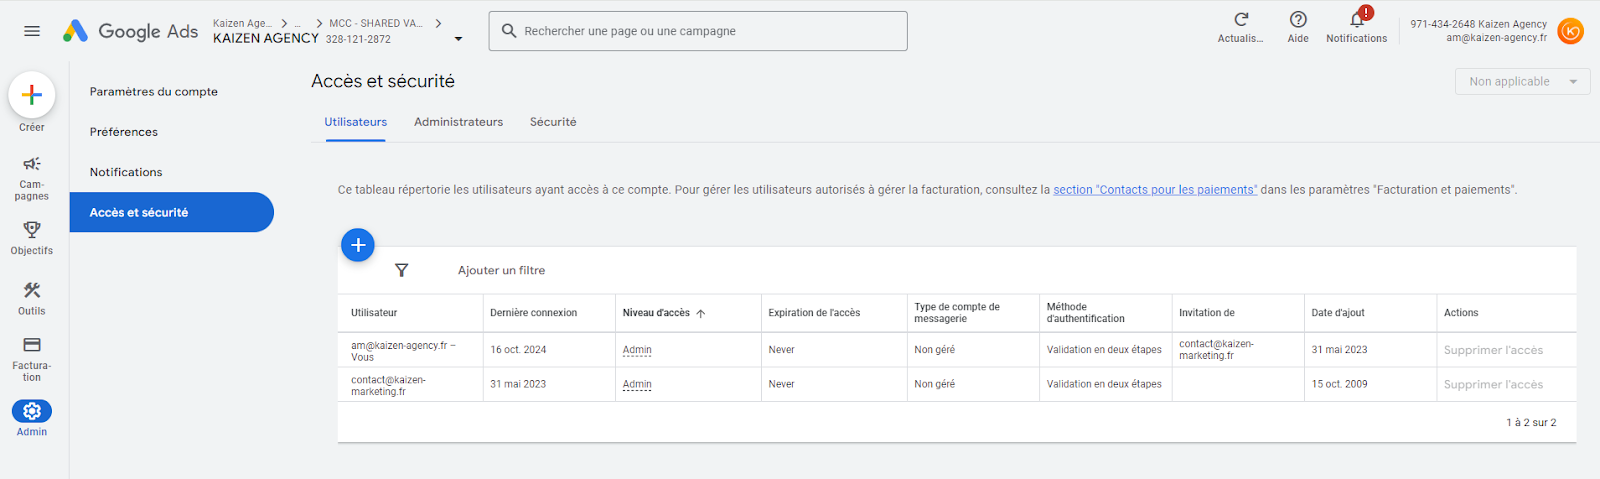
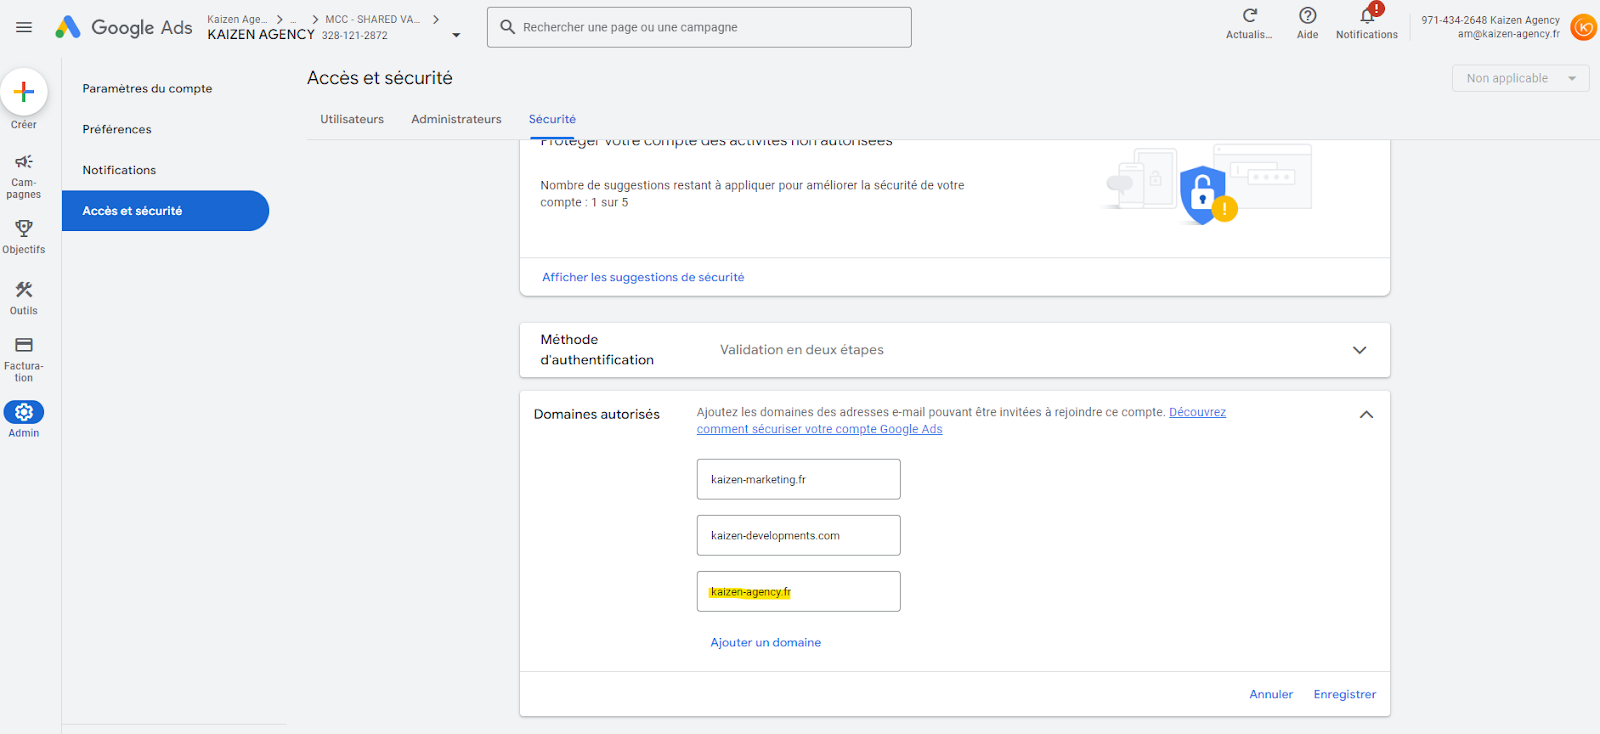
If the user does not belong to a domain registered on Google Ads, follow this procedure before you can share access:
- Click the “Security” tab
- Click “Allowed domains”
- Enter the email address domain. For Kaizen Agency, our email domain is “@kaizen-agency.fr”.
- Save this new domain
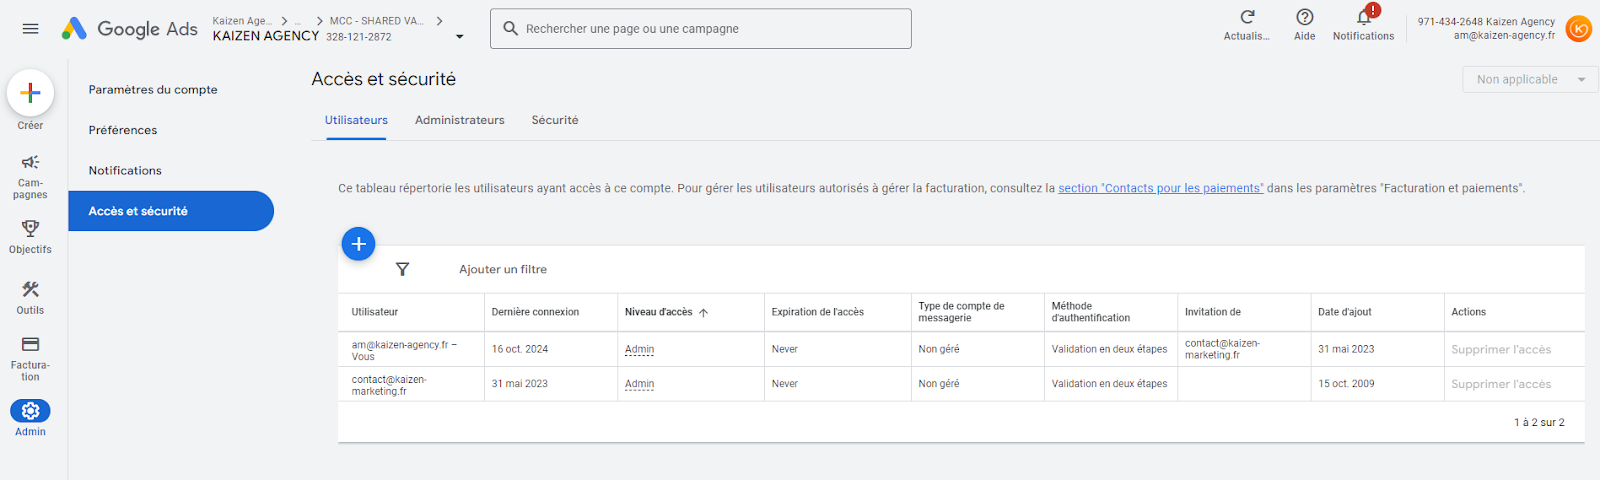
To add new users, follow these steps
- From your Google Ads account, go to “Admin” > “Access and security” > Click the blue “+” button.
- Enter the email address of the contact to add.
- Select the access level for this new contact (email only - billing - read only - standard - and admin), then send the request.
Note that clients should be set to read only. They must not make changes to the Google Ads account during our contract.
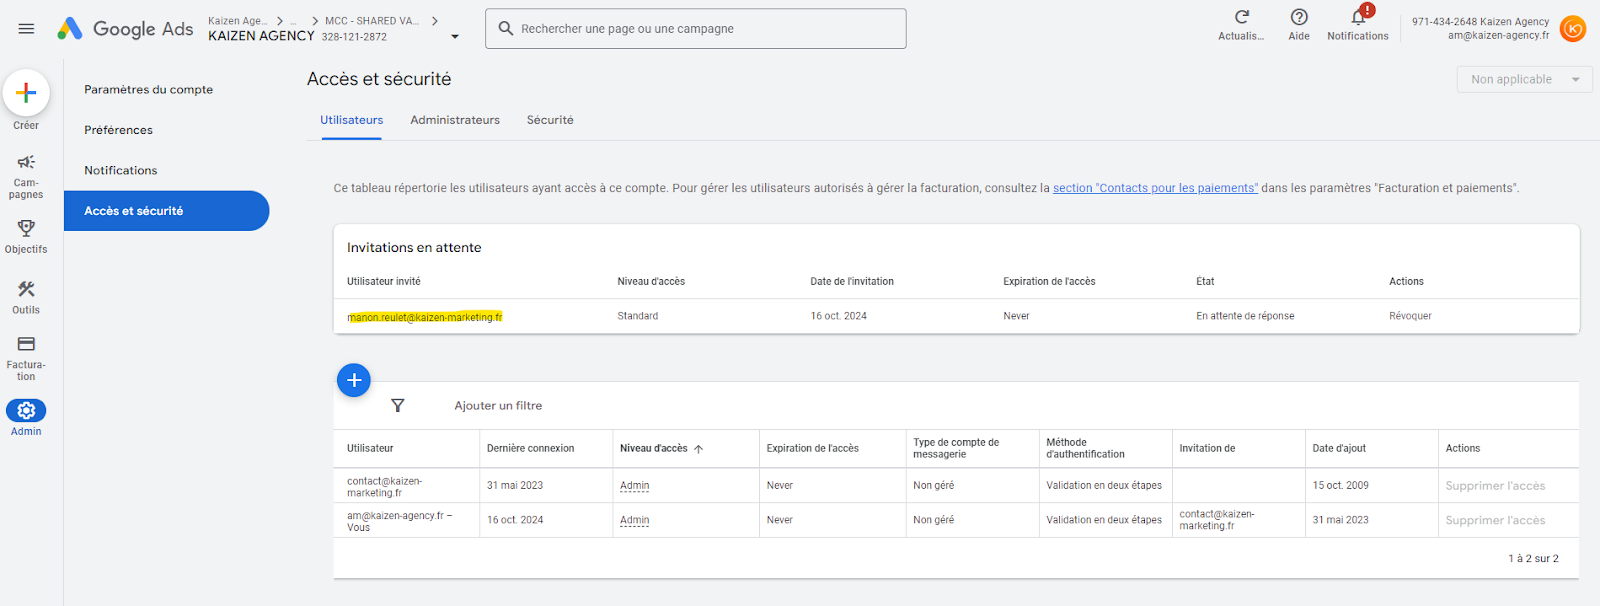
To check whether the newly added contact now has access to the Google Ads account, a new section appears with the invitation date, its recipient, and their access level:
How to find an invoice
To find an invoice, go to your client's Google Ads account, then to the “Billing” > “Documents” tab
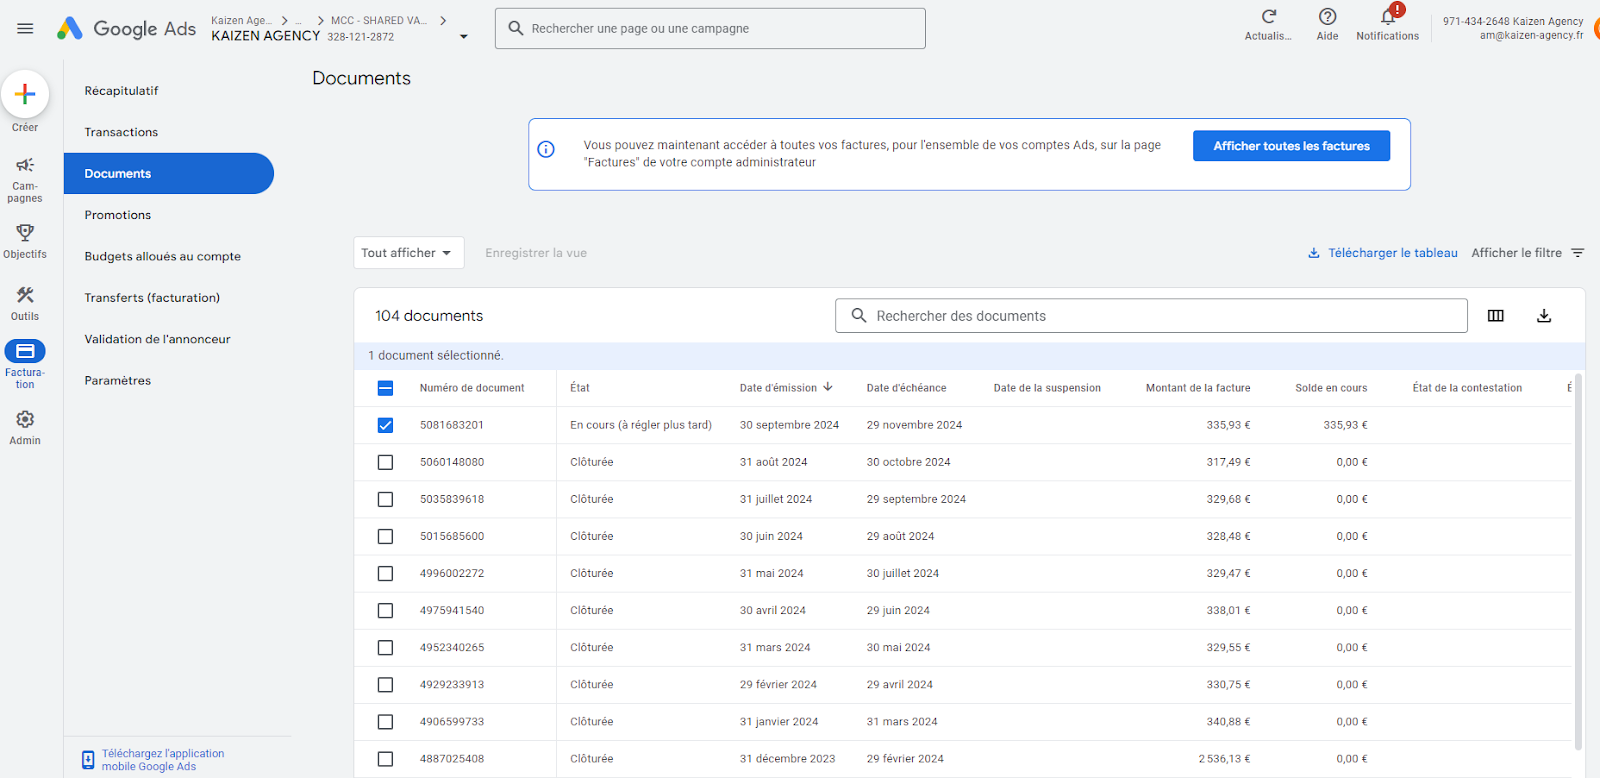
You can download multiple invoices by checking the relevant invoices, then clicking the download icon at the top right of the table.
A zip file containing the invoices will be generated and available in your computer's downloads.
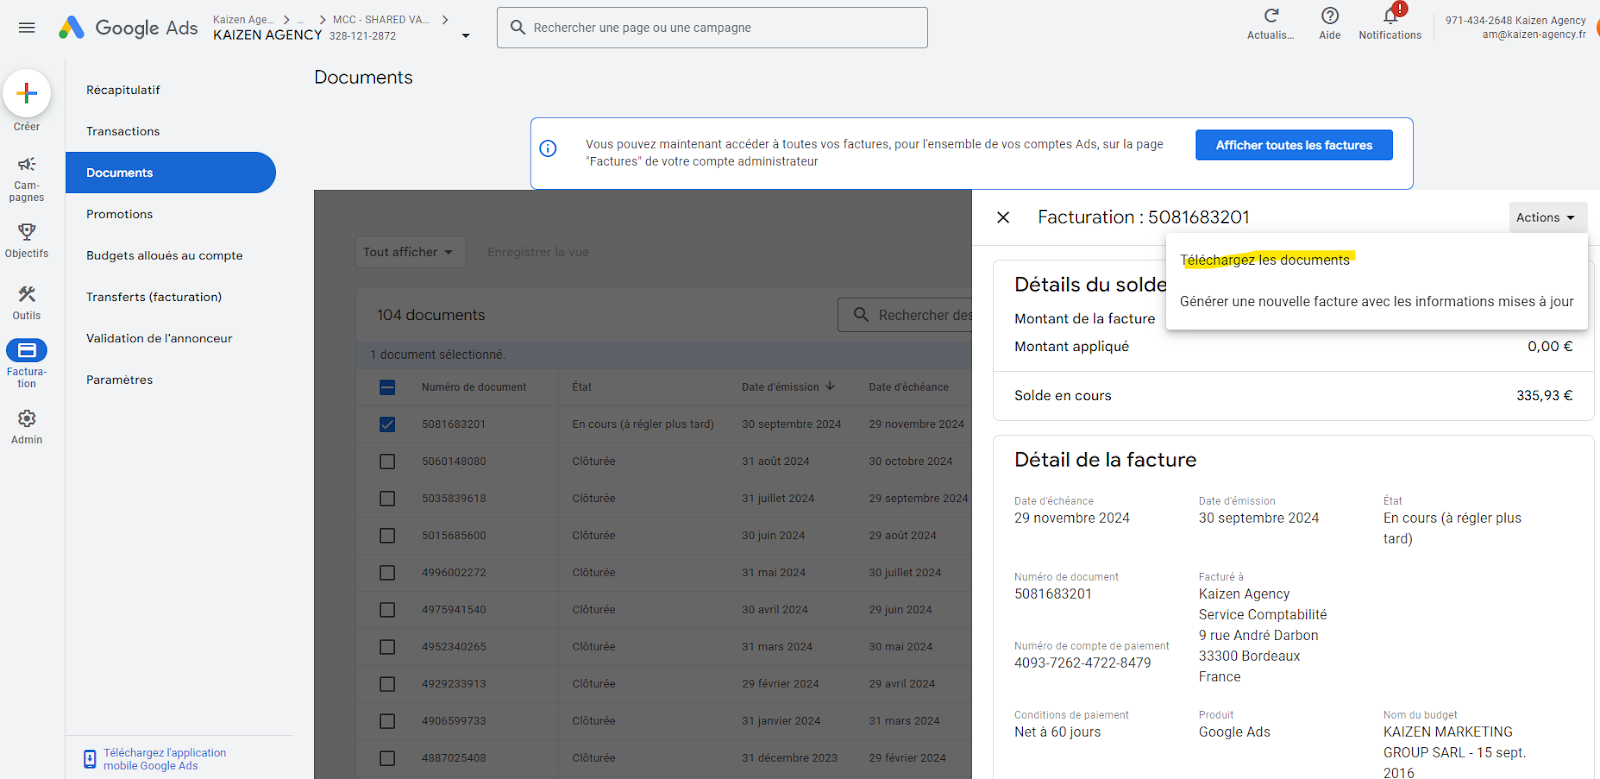
Of course, you can also download an individual invoice. To do so, click the relevant invoice. A window will open with the key information for that invoice as well as an “Actions” > “Download invoice” button
How to exclude a serving period on Google Ads
Data exclusions are an advanced tool that helps you flag a conversion data issue to your Smart Bidding strategy and thus reduce its impact on your performance.
- In your Google Ads account, click the Tools icon.
- Click the Budgets and bidding drop-down menu in the section menu.
- Click Adjustments.
- Select the "Exclusions" tab at the top.
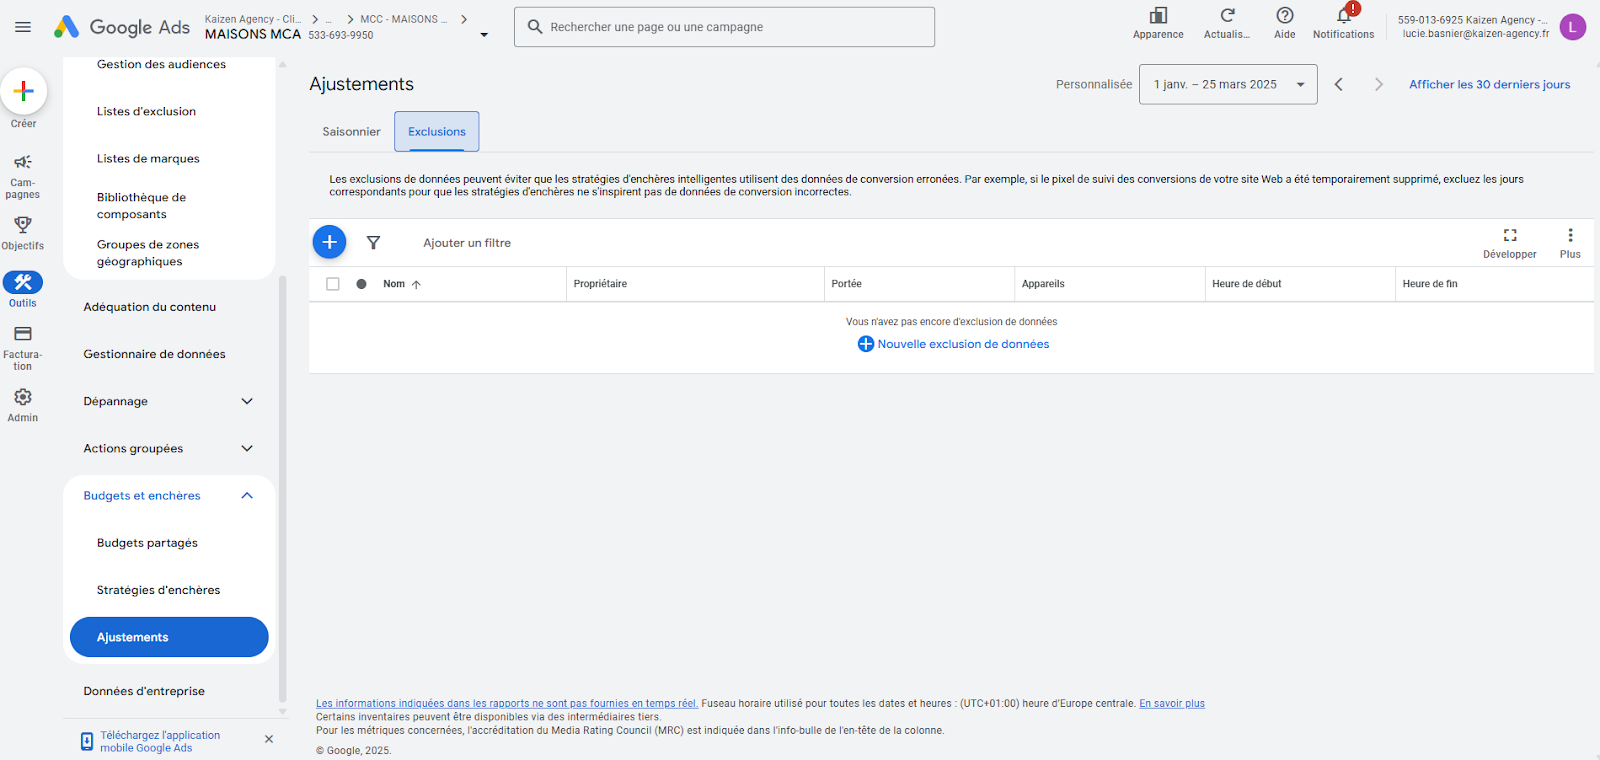
- Click the Plus button to add a data exclusion.
- Next to "Settings", enter a name and a description.
- Enter the start and end dates/times for the data you want to exclude. Conversions can be attributed to clicks that occurred earlier. Therefore, select a period that accounts for the usual conversion delay.
To date, we can only exclude short periods (about 15 days). If you want to exclude a longer period, you will need to create several exclusions.
-
Next to "Scope", select the campaigns and devices affected by this adjustment. You can select specific campaigns to exclude or the entire account.
-
Select the devices to exclude. For example, conversion errors may only affect mobile tracking.
-
Click Save.
-
Data exclusions can impact the performance of your bidding strategies. Before creating an exclusion, verify that the information is correct. Click Create a data exclusion.
-
You can apply data exclusions at the CM or sub-account level. Start and end times are based on the account time zone.
Learn more about best practices